It's debatable whether building your own CNC router is a cost effective way of getting a CNC machine into your garage. But what you learn in the process has high value and you can't quite put a price on that. There is a reason aluminum and steel constructed machines from reputable manufacturers are expensive - they have a lot of engineering behind them and they are not high volume products so it's difficult to get economies of scale for production. NOTE: Update 2019: Since this post was written in 2011, the landscape has changed considerably and a number of "affordable" machines based on aluminum extrusions are available for direct purchase. The CNC hobby machine market has exploded with offerings from companies like Carbide3D https://carbide3d.com/shapeoko/,
Inventables X-Carve https://www.inventables.com/technologies/x-carve,
At the Prosumer end of extruded aluminum machines, CNC Router Parts makes some excellent machines if you have the money http://www.cncrouterparts.com/
At the lowest cost end are some low cost imports that some have had great success with and may help you get a basic appreciation of CNC machining before you go and spend more money on a larger more capable machine.
https://www.amazon.com/s?k=cnc+3018
Anyway, lets get to the parts since I'm assuming your wallet is now ready for the great big sucking sound that is associated with building your own CNC Router:
Spindle Router
Hitachi M12VC 2-1/4-Horsepower Variable Speed Router
Variable speed is useful for efficiently cutting different materials and controlling noise levels (yes, I do have neighbors).
This router is currently available on http://www.amazon.com/ for $103

http://www.k2cnc.com/ has a ready made holder for this router which will save you some serious fabrication time especially if you are using hand tools to cut the parts.
Leadscrew
This design uses 1/2-10 ACME thread. You can get really low prices for leadscrews from ENCO but the threads are very rough and will destroy your nuts in no time at all. I bought some that ended up in the recycling pile. Nothing against ENCO just pointing out that parts for an automated CNC machine need a better finish than parts made for general industrial use.

Leadscrew Nuts
You have many choices here. The best choice is to use an anti-backlash nut. these are a bit pricey but I recommend them if your wallet can handle it. For this build, I made my own nuts from Delrin. They are not anti-backlash but I figured that as soon as the backlash starts affecting the accuracy, I'll make new ones. I found a sheet of 3/4" black delrin on ebay for $7 so the nuts cost roughly $2.33 each.

The nut is bolted to the frame using 1/4-20 SHCS. Threading requires an ACME tap. Taps are available from MSC (http://www.mscdirect.com/) but they are expensive.
 |
MSC ACME Tap
|
If you have the patience you can make your own from an offcut of the 1/2-10 ACME threaded rod. I got the idea from http://www.embeddedtronics.com/acmetap.html
Here's the tap I made. Use a dremel tool or grinder to reduce the diameter of the start of the screw and then mill 3 slots up the shaft roughly 120 degrees apart. When using the tap, all the removed material needs somewhere to go so it ends up in the slots. Make then as deep as you dare. Drill a 1/4" hole near the top into which you can slide a 1/4" steel rod to use as a handle. The ACME nut on the top was used to jam the rod in place. ACME nuts don't jam very well so add locktite.
 |
Homemade ACME tap
|
Motors
Stepper motors are cheaper than servos and the most common motor used for DIY and lower cost commercial offerings. They are run in open loop mode to simplify the design. Encoder feedback adds cost and complexity. As long as your steppers have high enough torque to overcome cutting loads without slipping, stepper motor systems will serve you well. Stepper torque reduces with increasing speed so you will occasionally have to throttle back to get through harder materials.
http://www.pdjinc.com/parts.html has 439 oz-in NEMA 23 Steppers listed at $45 each. That is a great deal.
Automation Direct also has good deals on steppers. A listing of what they have available can be seen at
My recommendation should you choose the Automation Direct motors would be the 276 oz-in, 200 steps/revolution Nema 23 motor.
I found NEMA 23 motors on ebay. My recommendation is to stick with NEMA 23 at 276 oz-in or higher torque motors.
 |
NEMA 23 Stepper Motor
|
Motor Mounts
Once you have found your steppers, they need to be mounted. I would tend to go for aluminum mounts for rigidity.
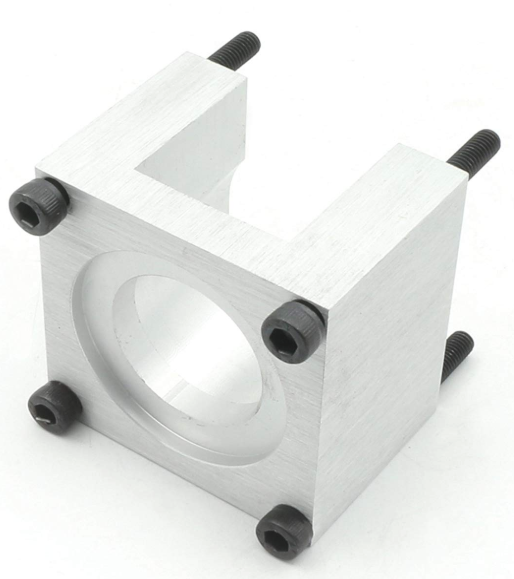 Considering how much time and effort is involved in manufacturing your own (and the additional time and materials cost for correcting the inevitable mistakes) buying these makes some sense. There are a number of other ebay auctions all offering different flavors of NEMA 23 mounts. For example, these nice looking mounts were available from https://www.amazon.com/s?k=nema+23+mount&ref=nb_sb_noss_2
Not having much sense I went ahead and made my own using the Micro Mill. The parts were first modeled in 3D CAD to make sure everything would fit. Each axis (a router has 3 - x axis from left to right, Y axis from front to back, and Z axis for up and down) is basically a replica of this assembly. Each component of the motor assembly will be discussed in detail later on.
 |
Key components for each motion axis assembly
|
Once the modelling was done, the parts were machined, slowly and carefully with a shop-vac providing a cooling stream of air.
 |
Machining the motor mounts
|
Once the motor mounts were machined and deburred, holes are drilled for 10-24 taps on one end and 10-24 clearance holes on the other end.
 |
Tapping the holes on one end
|
To be continued......
No comments:
Post a Comment